Environment Setup
SemanticSeg4EO processes all satellite imagery in an external Python environment, completely separate from QGIS. This page explains how to create and configure that environment.
Why an External Environment?
QGIS ships with its own modified Python environment containing specific versions of GDAL, numpy, and PyQt5. Installing PyTorch and its heavy dependencies directly into QGIS often causes:
GDAL/rasterio version conflicts
Qt DLL conflicts (QGIS Qt vs PyTorch Qt on Windows)
Crashes or broken QGIS on upgrade
The external environment approach means:
QGIS stays stable and untouched
You can freely manage GPU/CPU PyTorch versions
Deep learning libraries are cleanly isolated
Configuring the Plugin
When you first open SemanticSeg4EO, the environment status bar at the top of the dialog will show “No Python environment configured”.
The environment status bar before configuration.
You have two ways to point the plugin to your Python executable:
Quick method: Browse directly
Click Browse python… in the status bar. A file dialog opens — navigate to the
python.exe (Windows) or python / python3 (Linux/macOS) inside your
Conda or venv environment, select it, and you are done.
Typical locations:
Conda (Windows):
C:\Users\<you>\miniconda3\envs\<env>\python.exeConda (Linux/macOS):
~/miniconda3/envs/<env>/bin/pythonvenv (Windows):
C:\<folder>\Scripts\python.exevenv (Linux/macOS):
~/<folder>/bin/python
Full configuration dialog
Click Configure Environment to open the configuration dialog. It provides three options on a single screen:
Browse for python — same file dialog as above, with a prominent button and path hints.
Pick a detected environment — the dialog automatically scans your system for Conda environments (Miniconda, Anaconda, Miniforge, Mambaforge) and virtual environments in common locations. All detected environments appear in a dropdown list; select one and it is applied.
Type or paste a path — enter the full path to the Python executable manually.
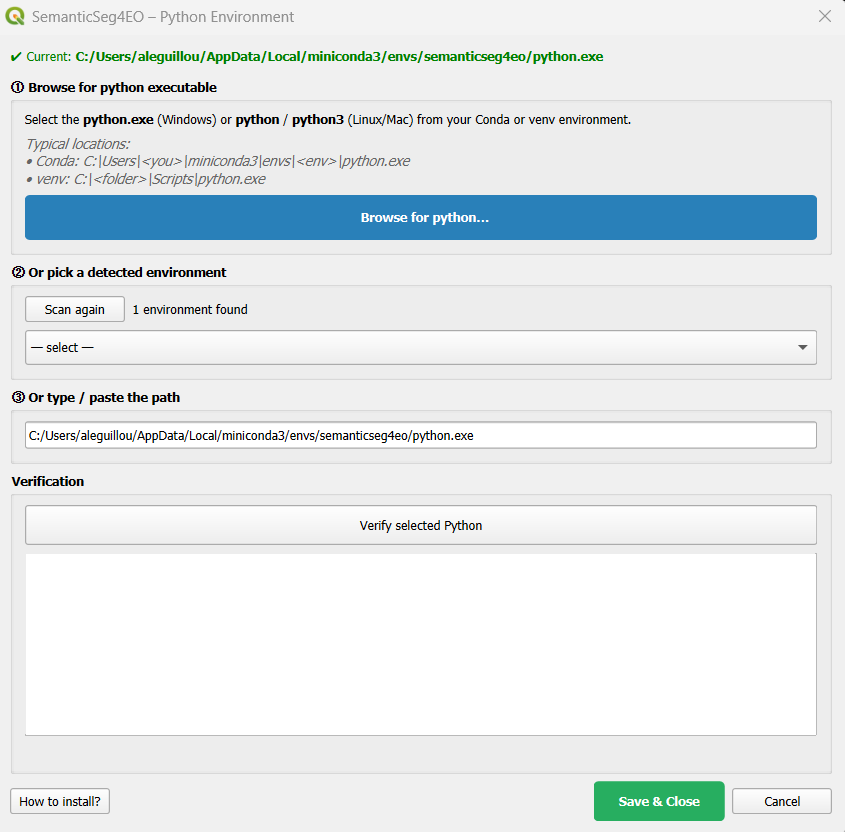
The environment configuration dialog. Browse, pick from the list, or type the path.
Once you have selected a path, click Verify selected Python to run a live check, then Save & Close. The status bar will update to show the active environment.
Creating the External Environment
If you do not have a suitable Python environment yet, follow one of the options below.
Option A: Conda (Recommended)
Conda handles complex binary dependencies (GDAL, rasterio, PyTorch CUDA) better than pip alone.
Step 1 — Install Miniconda or Anaconda
If you do not have Conda installed, download and install Miniconda (lightweight) or Anaconda (full distribution).
Step 2 — Create the environment
Open a terminal (Anaconda Prompt on Windows):
conda create -n semanticseg4eo python=3.10 -y
conda activate semanticseg4eo
Step 3 — Install PyTorch
Choose the command that matches your hardware:
CPU only (works everywhere, no GPU required):
pip install torch torchvision --index-url https://download.pytorch.org/whl/cpu
GPU — CUDA 11.8 (NVIDIA RTX 2000/3000 series):
pip install torch torchvision --index-url https://download.pytorch.org/whl/cu118
GPU — CUDA 12.1 (NVIDIA RTX 4000 series and newer):
pip install torch torchvision --index-url https://download.pytorch.org/whl/cu121
GPU — CUDA 12.4:
pip install torch torchvision --index-url https://download.pytorch.org/whl/cu124
Tip
To find your CUDA version, run nvidia-smi in a terminal. The CUDA version
is shown in the top-right corner.
Step 4 — Install the remaining dependencies
pip install -r requirements_external.txt
Or manually:
# Core geospatial and image I/O
pip install "numpy>=1.21,<2" rasterio tifffile imagecodecs geopandas opencv-python

# Segmentation model library (recommended)
pip install segmentation-models-pytorch

# Utilities
pip install scipy scikit-learn matplotlib tqdm

# Optional: modern architectures (SegFormer, HRNet, SwinUNet, ConvNeXt)
pip install transformers timm
Important
Always install PyTorch before the other packages. The
requirements_external.txt file does not include PyTorch because the correct
index URL depends on your hardware.
Important
The numpy<2 constraint is required. NumPy 2.x breaks the binary interface of
rasterio, OpenCV, and older PyTorch builds.
Option B: Python Virtual Environment (venv)
Use this option if you prefer not to install Conda.
Windows
python -m venv C:\semanticseg4eo_env
C:\semanticseg4eo_env\Scripts\activate

pip install torch torchvision --index-url https://download.pytorch.org/whl/cpu
pip install -r requirements_external.txt
Linux / macOS
python3 -m venv ~/semanticseg4eo_env
source ~/semanticseg4eo_env/bin/activate

pip install torch torchvision --index-url https://download.pytorch.org/whl/cpu
pip install -r requirements_external.txt
Dependency Reference
The table below lists all dependencies expected by the external scripts.
Package |
Required? |
Used by |
|---|---|---|
|
Yes |
Model training and prediction |
|
Yes |
Array operations (all scripts) |
|
Yes |
Reading/writing GeoTIFFs, georeferencing |
|
Yes |
Reading compressed TIFF patches during training |
|
Yes |
Reading grid shapefiles (patch extraction) |
|
Yes |
Image resizing / interpolation (patch extraction) |
|
Yes |
Gaussian filters (augmentation), confidence intervals (k-fold) |
|
Yes |
K-Fold cross-validation, class weight computation |
|
Yes |
Training plots, patch visualisation |
|
Yes |
Progress bars |
|
Recommended |
U-Net, U-Net++, DeepLabV3+, FPN, PSPNet, MAnet, PAN, LinkNet |
|
Optional |
SegFormer architectures |
|
Optional |
HRNet, SwinUNet, ConvNeXt encoders |
Verifying the Environment
In the configuration dialog, click Verify selected Python. The plugin will:
Run the selected Python executable
Check the Python version
Import each required and optional package and report its version
A successful verification looks like:
Python: C:\Users\user\miniconda3\envs\semanticseg4eo\python.exe
Python 3.10.12

Required packages:
  ✔ torch: 2.1.0+cu118
  ✔ numpy: 1.26.4
  ✔ rasterio: 1.3.10
  ✔ tifffile: 2024.2.12

Optional packages:
  ✔ installed: segmentation_models_pytorch
  ✔ installed: geopandas
  ✔ installed: cv2
  ✔ installed: transformers
  ✔ installed: timm

CUDA: available

✔ Environment is ready!
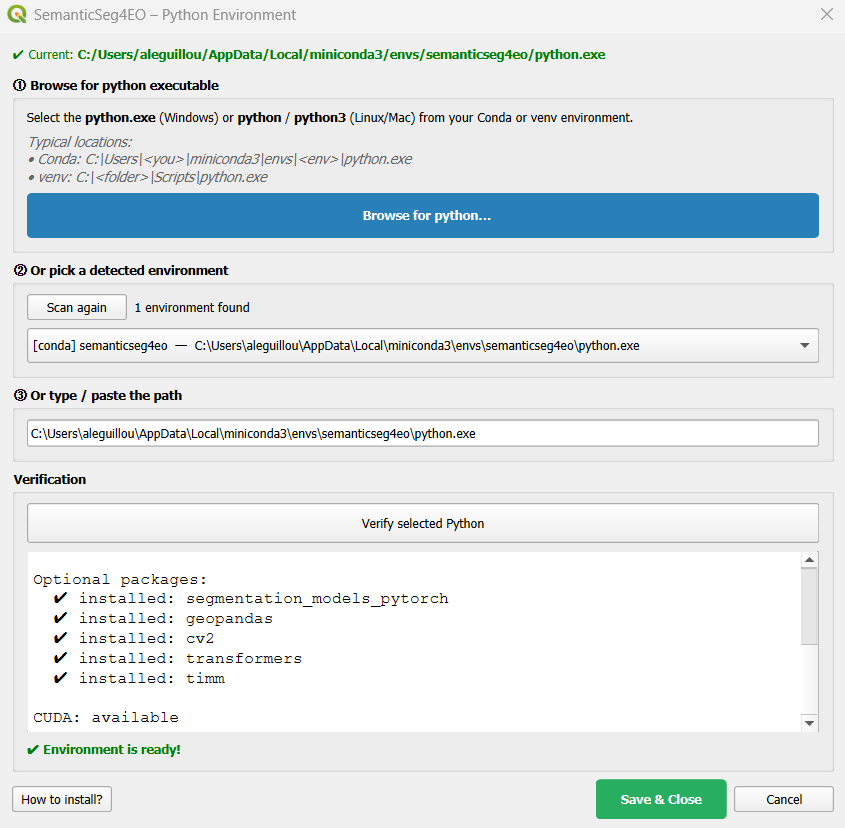
Verification output inside the configuration dialog.
After verification, click Save & Close. The status bar updates to show the environment type and Python path in green.

Status bar after successful configuration.
Environment Configuration File
The plugin stores the environment path in a config.json file located inside
the plugin folder. You can inspect or manually edit it if needed:
{
  "python_path": "C:/Users/user/miniconda3/envs/semanticseg4eo/python.exe",
  "env_type": "conda",
  "conda_env_name": "semanticseg4eo",
  "venv_path": "",
  "last_check": "",
  "dependencies_ok": true
}
To reconfigure the environment at any time, click Browse python… or Configure Environment in the status bar.
How the Environment Isolation Works
When SemanticSeg4EO launches a processing script, it:
Creates a clean copy of the system environment
Removes all QGIS-related variables (
PYTHONHOME,PYTHONPATH,QT_PLUGIN_PATH,QGIS_PREFIX_PATH, etc.)On Windows, filters QGIS/OSGeo4W paths from
PATHto prevent Qt DLL conflictsSets the conda environment’s own
GDAL_DATAandPROJ_LIBForces
PYTHONUTF8=1to handle paths with special characters (e.g. accented letters)
This guarantees that PyTorch and rasterio run in a fully isolated environment, with no interference from QGIS libraries.